

EISELIN SKI BASE REPAIR
Eiselin Ski Base Repair Demonstration
Ski & Snowboard Repair:
The Easiest, Fastest, and Most Reliable Way to Repair Ski and Snowboard Bases
Fill the scratch with rubber base powder and press it in firmly.
Apply a small amount of reactive base adhesive over the powder.
Wait just 60 seconds, then peel off the excess.
That’s it – your base is repaired and ready.
Made with Authentic Ski Base Material
Eiselin Ski Base Repair uses a patented formula that closely replicates the properties of original ski base material — offering outstanding adhesion, hardness, flexibility, wax absorption, and glide performance. The unique chemical reaction between the base powder and adhesive forms a permanent bond, delivering professional-grade repairs that last.
Thanks to this advanced formulation, even the toughest base damage — including deep core scratches near metal edges — can be repaired quickly and reliably. No crumbling. No sinking. Just a rock-solid bond in record time.
Ready to ski again in just 60 seconds.
Each kit includes a high-yield 10ml glue bottle, capable of repairing at least 40 deep scratches, making it one of the best value options on the market. The adhesive resists drying out, ensuring a long shelf life even after opening.
All powder is manufactured in Switzerland under strict quality control, and the adhesive is perfectly matched to ensure consistent, high-performance repairs every time.
What Our Partners Are Saying
“I repaired a couple core shots with Base Repair - one is actually along an edge - and skied three days of sub-zero temperatures in tight New England trees at Jay Peak, Vermont. P-Tex would have cracked and fallen out. This stuff is still in place and works so easily.
Thank you for an incredible product.”
“Bravo, you have a great product. I was able to test it from a friend. And we are extremely enthusiastic and grateful that there is finally a product that fills the holes, permanently, even at the edges. ”
“Absolutely the best repair kit!
We use your product daily and we think that it works great. I had very good feelings about this base repair product since ISPO, when I realized how fast a technician can work with it. ”
APPLICATION INSTRUCTIONS
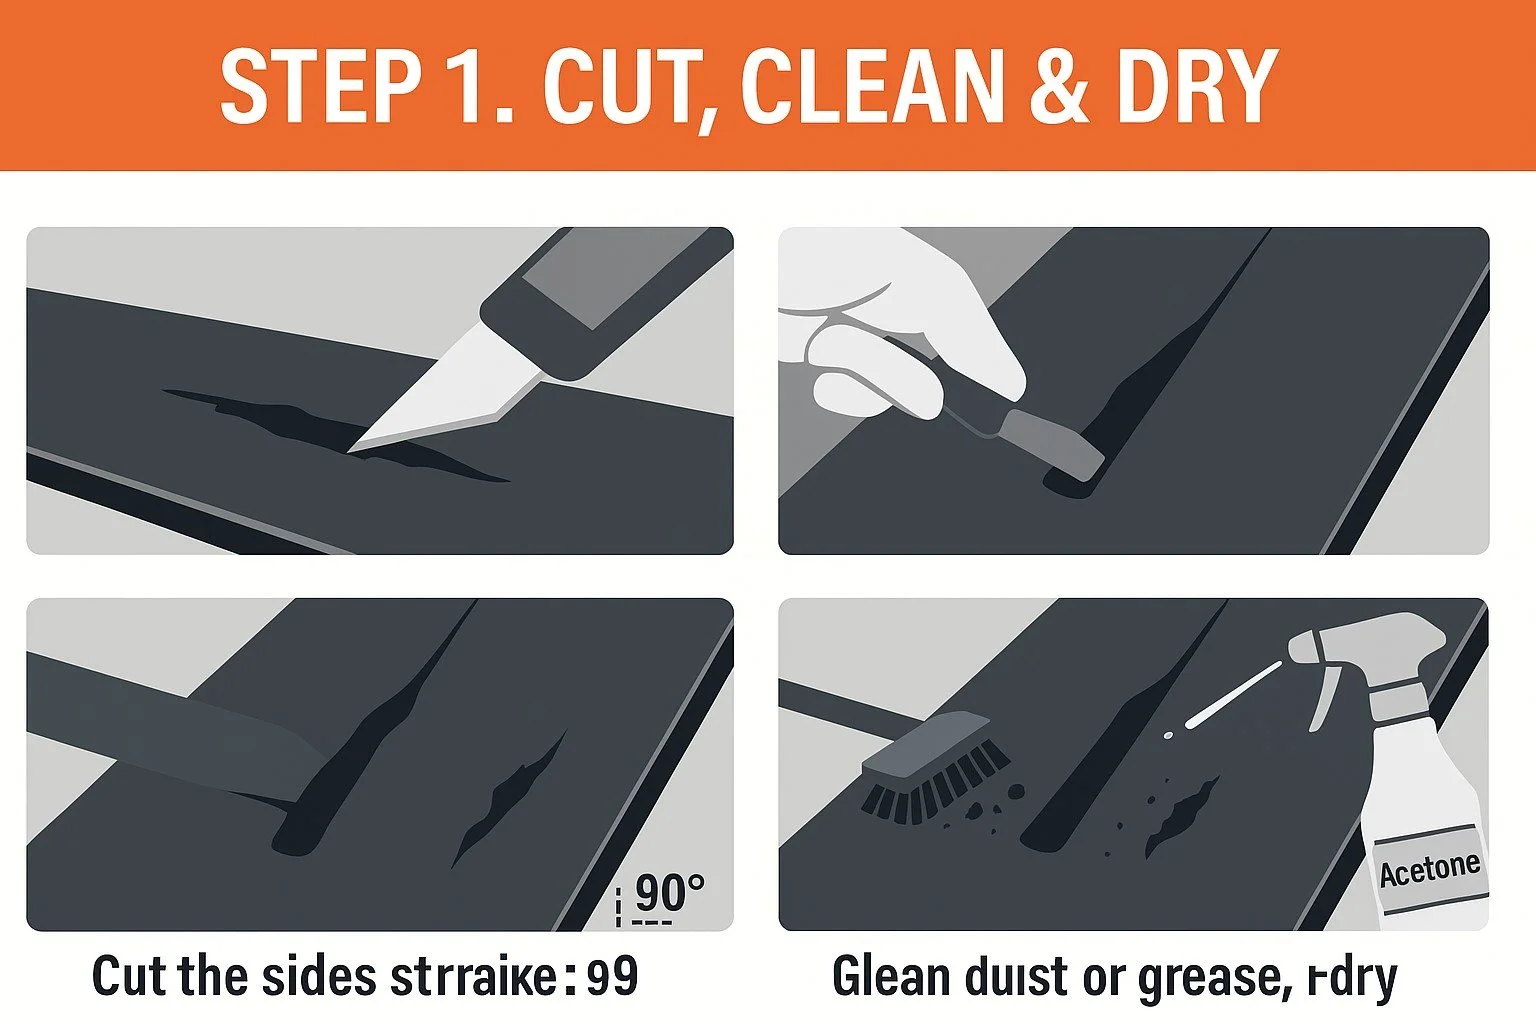
STEP 1: Cut, Clean & Dry
Start by flattening any bulged areas around the damage using a sharp knife. Remove all loose base material, wood, fiberglass, or debris. Trim the edges of the gouge straight at a 90° angle for optimal bonding.
Clean out the scar thoroughly — first with a brush or compressed air to remove dust, then with acetone to eliminate grease or wax. Allow the area to dry completely before proceeding.
Pro Tip: If the scar is less than 1 mm deep, carefully deepening it can improve adhesion and ensure a stronger, longer-lasting repair.
STEP 2: Fill the Scar with Base Powder
For scratches less than 2mm deep:
Pour the base powder directly from the bottle into the scar.
(⚠️ Fine dust – avoid inhalation.)
Fill slightly above the base level and extend just beyond the edges of the scar for full coverage. Avoid underfilling, as this can leave low spots. Overfilling may result in poor bonding if the layer exceeds 2mm in depth.
Firmly press the powder into the scar using a spatula or a cutter blade to compact it evenly.
For scars deeper than 2mm:
Use a multi-layer approach for better adhesion.
Pour the first layer of base powder directly into the scar, no thicker than 2mm.
Press the powder in firmly, ensuring there is room for additional layers.
Next, apply a few drops of base glue over the powder until it is fully saturated — a light pooling indicates the powder has absorbed enough.
(Avoid inhaling fumes. Perform this step in a well-ventilated area.)
Begin the next layer immediately using the same method. For the final layer, follow the instructions for shallow scars above to finish the repair flush with the base.


STEP 3: Apply the Base Glue
Carefully drip the base glue onto the compacted base powder. Only a few drops are needed — just enough to fully saturate the powder. When the glue begins to pool or drip off the surface, you've applied enough.
⚠️ Important:
Do not inhale the fumes. Always work outdoors or in a well-ventilated area.
Avoid dropping the glue from too high, as this can create holes in the powder. For better control, you can also let the glue flow in gently from the side.

STEP 4: Scrape Off Excess Material
Before filing, wipe away any remaining surface glue with a tissue to avoid contaminating your tools.
Use a body file or panzer file to carefully level the repair area. Take care not to damage the surrounding base — applying protective tape around the repair can help.
Finish by smoothing the area with fine-grit sandpaper for a flush, clean surface.

STEP 5: Hit the Slopes!
Your skis or snowboard are ready to ride.
While it’s recommended to wax at your earliest convenience for optimal glide, it’s not essential to do so immediately.
The repaired area stays flexible and durable in all temperature conditions — so you’re good to go.

European packaging shown
Each repair kit includes one 10ml bottle of Base Powder and one 10ml bottle of Base Glue.
This is enough material to repair an area of approximately 84 square centimeters (or 13 square inches) at a depth of 2 millimeters, which corresponds to the average thickness of a ski or snowboard base.
Hazard & Precautionary Statements
H335: May cause respiratory irritation
H319: Causes serious eye irritation
H315: Causes skin irritation
P101: If medical advice is needed, have product container or label at hand.
P102: Keep out of reach of children.
P271: Use only outdoors or in a well-ventilated area.
P280: Wear protective gloves/protective clothing/eye protection/face protection.
P302, P352: IF ON SKIN: Wash with plenty of water.
P305, P351, P338: IF in Eyes: Rinse cautiously with water for several minutes. Remove contact lenses, if present and easy to do. Continue rinsing.
P337, P313: If eye irritation persists: Get medical advice/attention.
P405: Store locked up.
P501: Dispose of contents/container in accordance with local regulation.
EUH202: Cyanoacrylate. Danger. Bonds skin and eyes in seconds. Keep out of the reach of children.

Tips:
Opening of the base-glue bottle:
Use a needle to puncture the bottle, or use a knife. Remember, that the more you cut, the wider the hole and the shorter the tip gets. so cut the minimum. Take care that no glue sprays out of the bottle while cutting the tip. At higher elevations, contents may be under pressure. Use gloves and eye protection.
Storage of the base-glue and the base-powder:
Store in a cool and dry location away from direct sunlight.
Application to fill the holes from bindings:
With Eiselin Ski Base Repair you also can fill the old holes from the bindings. You will have to work with several layers. Then you will get a result, many times more solid than the classic repair with plastic plugs. You will be able to drill a thread directly inside the repaired material. So you probably can drill the new holes closer to the old ones (check with your binding and ski manufacturers) and that will weaken the ski a lot less.
“Hello,
I’ve discovered and used your ski base repair for the first time and wanted to say thanks for the incredible product. ”
“The powder is absolutely brilliant. We also call it miracle powder. We are extremely satisfied in all respects.”
“While looking for an alternative, I stumbled across your product and gave it a try. Now after another 10 days of snow I am very impressed. Even in the park, your mixture held and didn’t break out.”